Showing posts with label paper crafts. Show all posts

Friday, February 17, 2012

My First Card Publication!!

Today I wanted to share the excitement because one of my cards has been featured in the March 2012 issue of CARDS magazine, and the feeling is SO awesome! 

The cover of CARDS Magazine March 2012 issue
(the card on the cover is not mine)

Looking forward to creating more- feeling very inspired to be featured in a magazine full of great talent!

xo

Tuesday, February 14, 2012

You've Got Love...

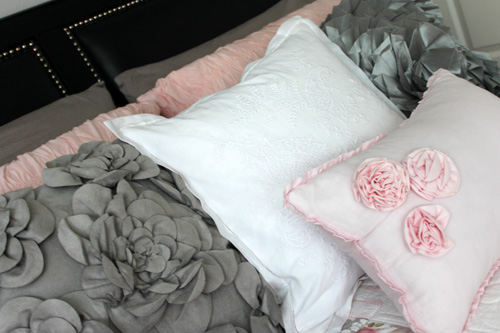
Quilt- Bed Bath & Beyond (Vintage Chic/Ariana); Pink Ruched Pillow Shams- Bed Bath & Beyond (DKNY);
White Bed Skirt- Bed Bath & Beyond; Decorative Pillows- Bed Bath & Beyond (Nicole Miller), Homegoods and Kirklands

I'm popping in, (a little late) but wanted to wish everyone a Happy Valentine's Day! I'm still getting acclimated to the west coast (hence why I've been MIA), but I'm loving my new room setup, especially my bed! So I thought I'd create a VDay card inspired by my bedroom colors: pink, gray, white & a splash of black. I just love this color combo, I think it really supports my "vintage, shabby chic" style!


This card measures 7x5 and is inspired by "love notes". I created the postcard to coordinate with the patterned paper and alphas. The result is pretty and feminine with a touch of Parisian influence- what says LOVE better than Paris?!?

Supplies: Card Stock- Bazzill; Patterned Paper/Butterfly- S.E.I; Glitter Brad- American Crafts (Dear Lizzy);
Chipboard Alphas- The Girls' Paperie; Alpha Stickers- October Afternoon; Alpha Rub-Ons- K&Company;
Postcard- Myself; Ribbon- Other


Well, thanks for stopping in! Enjoy the rest of your night and be sure to capture those special moments with your loved ones! xo

Thursday, December 8, 2011

December Daily 2011- Days 1-3

 Supplies: Paper Flower- Prima; Glitter Alphas- White Blossom; Sticker and Tag- Making Memories 

I've been doing a bit of catching up on my December Daily album in the last day or so. Around this time of year, the days seem to get away from us, which makes it hard to keep up with a daily project such as this one. Nevertheless, I've finished a few more pages and wanted to share them with you. The image above, is the back of my first page shown here, where I decided to document the CMA Country Christmas special that I watched on TV that night (while creating my first DD page). I collaged images I found online from the show and then added my own personal touch. This year, I've decided that I'm going to try to document 2 events for each day. The front page being the main story and the back of that page, being the second story (which could be a movie I watched that day, or a poem, quote or song lyrics that pertain to that day's story). So far it's working out quite nicely!


 Supplies: Patterned Paper- Cloud 9 Design; Rhinestone Spiral; Want 2 Scrap;
Word Stickers & Circle Alpha Stickers- Authentique; Chipboard Accent- Echo Park

DD day #2 documents the Beyonce interview on 20/20 with Katie Couric that I watched with my cousin Faithe. I'm a HUGE Beyonce fan, so I just had to watch this interview! Here I also used pictures that I found online from the interview and Beyonce's Roseland Ballroom Concert (since they spoke about it during the interview). I absolutely adore this picture of Beyonce performing that I found here. To personalize it, I added some of the lyrics from her song Best Thing I Never Had and part of a rhinestone spiral from Want 2 Scrap.

  Supplies: Patterned Paper- K&Company; Number Tag- Making Memories

The back of day #2 is dedicated to the movie A Golden Christmas 2 (which is what I watched later that night). It was the cutest Christmas movie with a beautiful love story! *wink*


Supplies: Patterned Paper- K&Company and Jillibean Soup; Tag- Jenni Bowlin

On day #3 I went to the mall for the first time this season, and Santa was already in the building! Of course they also had all of the decor up, and I couldn't help but get a picture of the winter wonderland! The title is part of the patterned paper background that I used by K&Company. I wanted the pictures to look like Polaroids, so I created the Polaroid frames in adobe photoshop and placed them over the pictures before resizing and printed them for my DD. The quote at the bottom of the page says; "Christmas is not a time nor a season, but a state of mind. To cherish peace & goodwill, to be plenteous in mercy, is to have the real spirit of Christmas."- Calvin Coolidge

Supplies: Patterned Paper- American Crafts; Paper Flowers- Prima; Tag- Making Memories;
Brad & Chipboard Accent- Echo Park; Decorative Punch- Martha Stewart Crafts

On the back of day #3 I added the song lyrics for It's Beginning To Look A Lot Like Christmas (which coordinates with the title used on the front of the page- and the pictures). I printed the lyrics on brown kraft paper and flicked a small paint brush (dipped in Mister Huey's holly berry ink) over the page to create little ink splatters. I also inked the edges of the page with tea dye distress ink from Ranger Inks. The bottom edge was die cut using the eyelet lace punch from Martha Stewart.

Now to catch up on days 4-7! Gotta keep the December Daily flow going! *wink* xo


Album photos taken by: Wahkuna

Wednesday, December 7, 2011

Holiday Card Making 2011


This week, I've been working on my holiday cards! For this year's card- I was inspired by a design from Cards 2010 Christmas Card magazine. The inspiration was an image of a Christmas tree stamped out of green spirals, with the sentiment Merry Christmas stamped across the tree in red ink, about 3/4" down on the card. So for my own spin on this, I found a Christmas tree graphic made of birds from the Graphic's Fairy and added a Season's Greetings garland along with my own digital sparkle button with a red/white twine bow. Here's how the card was created;


First I created the design using Adobe Illustrator and Photoshop and printed it on 6"x8" blank white cards from Studio G (that I bought at Michael's for $1.50 for a set of 8 cards/envelopes).


After printing all of the cards, I used tacky glue along with a tooth pick for spreading/smoothing and created the base for fallen snow on some parts of the tree. Then I sprinkled extra fine white glitter over the patches of glue to make the snow.


Once all the glitter was completely dry, I used Fabri-Tac permanent adhesive glue to adhere red and green rhinestones used as ornaments on the tree. And here is the finished product;


There's a sentiment printed on the inside of the cards that says; "May the spirit of the season bring you love, happiness and joy!"

I made 24 of these cards to send to family and friends. There are a few more to finish up today and they will be in the mail by the end of the week! And soon this will be another holiday project crossed off the list. I'm slowly but steadily getting things done over here. *smile*

I hope you enjoyed this overview of my holiday card making process for 2011! Happy Holidays! xo


Supplies Used:


Photos taken by: Wahkuna

Monday, December 5, 2011

Weekend in Review Vol.#7- Our Christmas tree search


This weekend was full of holiday cheer! Christmas decorating is in the midst, and we also took a trip to A Quiet Place Tree Farm to find our lucky tree for 2011! We actually visited two tree farms, but the second one was the charm! We spotted our tree within 5 mins. of being there, and realized we lucked out this year with a beautiful white spruce!! Mom is totally excited, and I'm happy because it was my first time searching for a Christmas tree at a tree farm, of which I picked out (yyeeaayyyy!). While we were there, I also met the cutest little dog named Netty...she was so sweet and naturally had to be featured here on my blog! Anyway, there will be more pictures to come once our tree is up and decorated! I hope you're enjoying this festive time of year! Be back soon...xo


Photos take by: Wahkuna

Wednesday, November 23, 2011

December Daily 2011 Part 3


Happy Thanksgiving Eve!! I'm popping in today really quick to show you the progress I made on my DD yesterday. I finalized the cover (except for a possible handwritten quote I might add to the bottom) and added a shiny textured "Christmasy" ribbon trim. It looks very festive (like a trim you'd see on a Christmas tree), I like it.


And here are some of my transparent overlays to go before each page. I designed most of them on the computer, except for the chicken wire and green circle overlays from Hambly Studios which came in my DD kit. I created the overlays in all different sizes, to mix it up a little and add variation to my DD.

Here are a few close-ups:


Yesterday my mom and I were both working on our December Daily together. It was really nice to spend quality time together while creating something that we will cherish for years to come. We also did this last year and plan to make a tradition of it! I'll be back later this week to share more photos of the DD progress... 

Right now we're off to finish our shopping for Thanksgiving dinner! I hope you all are enjoying your day so far! xo


Photos taken by: Wahkuna

Tuesday, November 22, 2011

December Daily 2011 Part 2


December daily is finally under way (for me)! A little late, but it's happening nonetheless! I spent some time yesterday afternoon planning the outside cover of my album, and this is what I came up with. I really like it so far- I'm a very traditional Christmas kind-of girl, so of course it's red & green. As I said in my previous post here, I'm using the December Daily kit by Ali Edwards & Studio Calico and I'm loving it! I'm also using some things from last year's Christmas stash that I still have, after all, that's what scrapbooking is all about right, using up those "scraps"!

The numbers and title in the above pictures are not stuck down yet...I'm still deciding if I want the cover arranged this way, or slightly different. But the general look will remain the same- even if some of the placement changes. The background paper is already adhered to the album, so that part is permanent! BTW, I strongly suggest that if you are doing a December Daily, and you're on Pinterest, check out all the DD inspiration there, because there's A LOT! Good luck with your DD, and I'll be back soon to post more updates with mine. *wink*


Photos taken by: Wahkuna

Thursday, November 17, 2011

December Daily 2011 Part 1


I can't even believe it's that time of year again, to start working on my December Daily album! I probably should've already started thinking about how I'm going to set up and decorate my album this year, but I haven't! Life always gets away from us and before you know it, you have to think fast! Luckily I took enough initiative to order the December Daily kit by Ali Edwards and Studio Calico before it was sold out- PHEW! I also tweaked the design of my pages from last year and was able to get the file to the printer earlier this week. I picked up the printed pages yesterday (for my mom and I) and now need to focus on the fun part- decorating!! The possibilities are endless and that's what I love most about this album...I'm so excited!

Unlike last year, I plan to complete my December Daily and be proud of the outcome! So I'll be back sometime soon with updates on my progress. Until then, happy crafting my friends!

BTW, are any of you working on a December Daily album too? If so, how do you go about creating your album? Please feel free to share your crafty tips!


Photo taken by: Wahkuna (via camera phone)

Tuesday, November 15, 2011

New Card: A Baby Boy Is...


Supplies Used: Animal Crackers Jack Collection- Making Memories; Ribbon & Metal Decorative Bobby Pin- Making Memories (Chloe's Closet); Cardstock- Bazzill; Font- CK Ali


It seems this has been the Year of the Babies (at least in my family). We've already had 2 new additions and have 2 more on the way (one who's expected any day now). It's so exciting to see all these new little faces, fingers and toes- they are too cute! I'm happy to have an ever growing family full of amazing people! *smile*

This card (with matching envelope) was made for one of the newest additions- Jaydin (whom I blogged about yesterday). I'm working on his baby memory book which will have a similar theme, but in the meantime- this was his "welcome to the world" greeting!

Tip: To get the sentiment on the journaling tag I first found a quote that I thought was appropriate from Scrapbook.com. Then I copied it- opened a new document in Photoshop and pasted it into the new document. I resized it and printed it out on all purpose printing paper. Once I felt the size was perfect, I taped the journaling tag right over the printed quote and re-printed the document (using this same piece of paper). The quote was printed onto the tag (which was placed directly on top of the original print). After it was printed, I carefully removed the taped journaling tag from the paper (being careful not to tear it) and adhered it to my card.


Enjoy! xo


Photos taken by: Wahkuna


Thursday, November 10, 2011

Handmade Inspiration Board #3: Thanksgiving

It's about that time- to start thinking about Thanksgiving and I can't wait for the day! I love this holiday the most because if focuses on family, thankfulness and AMAZING food! This year I am in charge of the Thanksgiving dinner (it's my first time, so all helpful tips are welcome *wink*), so I thought I would gather some inspiration for the day and build from there. Here is my inspiration folder, I hope you're able to gather some ideas from it as well! xo


Supplies Used; Patterned Paper- Cosmo Cricket and Crate Paper; Cardstock- American Crafts and Bazzill; Transparent Scroll Design- K&Company; Doily Rub-Ons- Hambly Studios; Gem Brad- Making Memories; Paper & Crochet Flowers- Prima Marketing Inc.; Alpha Stickers- Making Memories; Stitched Brad- Basic Grey


Images Used;
Leaf Printed Linens- Martha Stewart 
Thanksgiving Table Setting- Martha Stewart 
Fall Floral Basket- Martha Stewart
Give Thanks (Gobble Gobble)- Better Homes and Gardens 
Thanksgiving Poem- Better Homes and Gardens


(Photos of inspiration board by; Wahkuna)


Tuesday, November 1, 2011

Just for you!

I can't even believe it's already Nov. 1st! Have I mentioned how much I LOVE this time of year?!? I'm pretty sure I have, but I still don't think that's enough! So today I'm here to share another fall inspired card that I created.

I used products from the Mind the Gap kit by Studio Calico, a lace punch, lace trim and ribbon with scallop to create the feminine feel. The colors are ivory, green, orange and brown- perfect harvest inspired colors! The pumpkin in the background was actually picked during my visit to the Westport Rivers vineyard- which I posted about here. And speaking of fall, I think now that we are officially in November, I need to get started on my Thanksgiving inspiration board...so stay tuned, there will be more to come on that! xo


Supplies Used: Cardstock- Bazzill Basics; Patterned Paper- My Mind's Eye, K&Company; Buttons- My Mind's Eye; Lace Trim- TPC Corp.; Rose Trim- Webster Pages; Letter Stickers- Sassafrass; Ribbon- Making Memories; Kraft Envelopes- Pebbles Inc.; Lace Punch; Martha Stewart Crafts; Distress Ink; Ranger/Tim Holtz; Stamps- Other

Photos by; Wahkuna

Tuesday, October 11, 2011

Baby Memory Book

Just as promised, here are some images of the present I gave with the baby boy card from yesterday's post. It was a Baby Memory Book I designed, with pages for record keeping such as; baby's arrival, birth announcement,  birth facts, etc and pages dedicated to photos to document all of the little ones special moments. In keeping with the elephant themed baby shower, I designed a cute little mommy/baby elephant design for the top border of each page and used some elephant embellishments to decorate the front cover. And to make it more personalized, there is a 3x3" window on the cover to add baby's photo. This book is about 35 pages- a great handmade keepsake for baby's first year.

xo

Monday, October 10, 2011

Baby Shower Card- Boy


Hi all! I hope everyone is doing well and enjoyed their weekend! The weather here has been ABSOLUTELY perfect! It's quite amazing because this time of year (in the northeast) is usually pretty chilly! But I'm taking it all in and thanking mother nature for gracing us with this FANTASTIC-ness! (and you gotta love my "made-up" lingo too) *wink*

Today I wanted to share a cute little baby boy card that I recently made for a cousin's baby shower last month. The elephant themed shower was super adorable, which usually comes with the territory of a baby shower. It was an intimate gathering with her closest family & friends. There was plenty of food and cute desserts which included; an adorable baby boy cake, cupcakes (decorated oh-so-adorably), cookies, candy and tons more! We played a few games, had a lot of laughs and just enjoyed good company and the relaxed atmosphere.

I made this card in about 15 minutes (literally) and most of the products used are from the Animal Crackers Collection by Making Memories (by far my favorite baby scrapbooking collection to date). The cutest part of this card are the mini clothes pins used to hang the "boy" letters, as if it were a clothes line. When I came across these clothes pins from Creative Impressions I couldn't resist- they are SO tiny and cute, they add a little charm, right?! So stay tuned, because I will be back tomorrow to post about the present (which went along with this card). Be back soon...

xo
LinkWithin

Related Posts with Thumbnails